Delta Force: Black Hawk Down campaign mode consists of seven missions. Players can complete the entire campaign in around 1 Hour and 45 Minutes. The seven-mission gameplay is surely going to be breathtaking. You may read this guide to know more about the details.
- Mission 1: Olympic Hotel Rai
- Mission 2: Convoy Protection
- Mission 3: First Black Hawk Down
- Mission 4: Super 64 Crash Response
- Mission 5: Market Operations
- Mission 6: Building Defense
- Mission 7: Stadium Extraction
Introduction
Delta Force: Black Hawk Down puts you in the boots of a Delta Force operator during the infamous Battle of Mogadishu. This comprehensive walkthrough will guide you through each mission while providing tactical advice and strategic tips for survival.
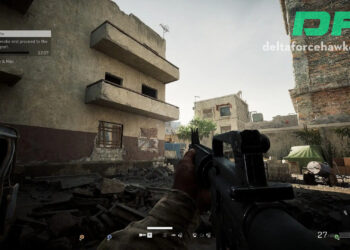
Mission 1: Olympic Hotel Raid
![Delta Force Black Hawk Down Ultimate Guide [7 Missions]](https://deltaforcehawkops.com/wp-content/uploads/sites/2/2025/02/Screenshot-2025-02-23-at-12.46.09 AM.jpg)
Mission Overview
- Objective: Capture ID’s high-ranking officials near Olympic Hotel
- Time Limit: 30 minutes
- Primary Challenges: Building infiltration, target capture, extraction
Step-by-Step Walkthrough
- Initial Deployment (1545 Hours)
- Watch for burning tires (militia warning signs)
- Follow Super 64 and Super 62 to landing zone
- Establish perimeter after touchdown
- Target Building Approach
- Look for white two-story building with white car
- Clear streets systematically
- Use cover to avoid militia fire
- Building Infiltration
- Enter building with team
- Clear rooms methodically
- Remember: Targets are unarmed – no lethal force
- Watch ammunition levels
- Defensive Phase
- Hold position while awaiting extraction
- Guard side entrances
- Watch for rear attacks
- Maintain ammunition reserves
- Extraction
- Wait for convoy signal
- Secure all captured targets
- Defend position until extraction arrives
Mission 2: Convoy Protection
![Delta Force Black Hawk Down Ultimate Guide [7 Missions]](https://deltaforcehawkops.com/wp-content/uploads/sites/2/2025/02/Screenshot-2025-02-23-at-12.45.56 AM.jpg)
Mission Overview
- Objective: Protect convoy carrying captured targets
- Key Challenges: Narrow streets, RPG threats, multiple ambush points
Step-by-Step Walkthrough
- Initial Convoy Formation
- Take lead position
- Watch for RPG positions
- Clear narrow alleys before convoy proceeds
- Route Navigation
- Clear buildings along route
- Watch for oil truck threats
- Maintain convoy spacing
- Eliminate RPG positions
- Combat Situations
- Handle multiple pickup truck attacks
- Clear rooftop threats
- Protect convoy from flanking attacks
Mission 3: First Black Hawk Down

Mission Overview
- Objective: Respond to Super 61 crash
- Critical Elements: Quick response, survivor protection
Walkthrough Steps
- Initial Response
- Navigate through shantytown
- Follow black smoke to crash site
- Handle mortar threats
- Clear market area
- Crash Site Securing
- Establish defensive perimeter
- Clear RPG threats
- Protect medical evacuation team
- Handle multiple militia waves
Mission 4: Super 64 Crash Response
![Delta Force Black Hawk Down Ultimate Guide [7 Missions]](https://deltaforcehawkops.com/wp-content/uploads/sites/2/2025/02/DELTA-FORCE-BLACK-HAWK-DOWN-Gameplay-Walkthrough-Campaign-FULL-GAME-4K-60FPS-PC-No-Commentary-39-32-screenshot.png)
Mission Overview
- Objective: Reach and secure second crash site
- Challenges: Heavy resistance, multiple defensive positions
Detailed Steps
- Site Approach
- Navigate through hostile territory
- Handle rooftop threats
- Clear multiple militia positions
- Crash Site Operations
- Secure immediate area
- Protect crash survivors
- Establish defensive positions
- Handle reinforcement waves
Mission 5: Market Operations
![Delta Force Black Hawk Down Ultimate Guide [7 Missions]](https://deltaforcehawkops.com/wp-content/uploads/sites/2/2025/02/black-hawk-down-news.jpg)
Mission Overview
- Objective: Clear market area, eliminate mortar threats
- Key Elements: Urban combat, multiple threats
Walkthrough
- Market Entry
- Clear entrance points
- Eliminate mortar positions
- Handle close-quarters combat
- Watch for ambush points
- Area Clearing
- Systematic building clearance
- Eliminate sniper threats
- Secure strategic positions
- Handle militia counterattacks
Mission 6: Building Defense
Mission Overview
- Objective: Hold defensive positions, protect wounded
- Critical Elements: Resource management, position defense
Detailed Steps
- Initial Setup
- Secure building entrances
- Establish firing positions
- Set up defensive perimeters
- Manage ammunition supplies
- Defense Operations
- Handle multiple attack waves
- Protect wounded personnel
- Maintain communication lines
- Coordinate air support
Mission 7: Stadium Extraction
Mission Overview
- Objective: Reach stadium extraction point
- Distance: 1600 meters
- Key Challenges: Continuous combat, escort duties
Step-by-Step Guide
- Initial Movement
- Form up with convoy
- Protect vehicles
- Handle street ambushes
- Manage resources
- Final Push
- Cover wounded personnel
- Handle last militia waves
- Reach stadium perimeter
- Complete extraction
General Combat Tips
- Always check corners and watch rooftops
- Conserve ammunition when possible
- Use cover extensively
- Maintain squad cohesion
- Listen for RPG warnings
- Watch for technical vehicles
Survival Strategies
- Ammunition Management
- Regular ammo checks
- Conservative firing
- Team ammunition sharing
- Strategic reloading
- Cover Usage
- Use building corners
- Utilize vehicle cover
- Avoid open areas
- Watch for flanking positions
- Team Tactics
- Maintain visual contact
- Cover team movements
- Coordinate fire
- Protect wounded teammates
Remember: This campaign follows the historical events of the Battle of Mogadishu. Each mission connects to create a continuous narrative of the operation. Success requires patience, tactical thinking, and resource management.